Real-Time Security Alerts: Integrating BlueIris and Telegram using n8n Webhooks
My name is Hugo Alves and I am a Software Developer from Lisbon.
I have been professionally writing code since 2013. I work mainly with Java backend applications, typically using Spring Boot with the traditional Servlet Stack, Kafka, Docker, REST APIs and so on. I also like to code in Python, and more recently GO. Apart from the coding part I’m also very interested by networking and security.
The objective of this blog is to document some side projects I’m doing and everything I may think it can be useful or interesting.
This tutorial aims to guide you through integrating n8n and BlueIris, enabling users to receive Telegram notifications whenever motion is detected by one of the cameras in BlueIris.
BlueIris is a video management software that is widely used to manage the recordings of security IP cams. Besides the video related tasks, like recordings, archiving, backups and so on it also enables us to create triggers and alerts to notify the user that something happened.
On the other end, we have N8n. N8n is an open-source/fair-code workflow automation software that can be installed locally, alternatively, we can also use the managed cloud version. If you are familiar with IFTTT then you will find it very similar to n8n. For this tutorial it doesn't matter which version we use, but I'll be running n8n on a docker instance just for the sake of this tutorial.
And by combining both, we can create a fully functional workflow that will send alert notifications to Telegram whenever BlueIris detects motion on the cameras. A significant benefit, particularly for me, is the ability to install n8n on my local network, allowing me to maintain limited internet access for the BlueIris machine.
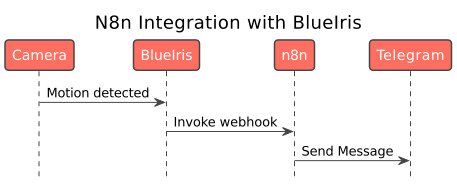
At the end of this tutorial, we will have a workflow that is triggered whenever BlueIris detects motion on a camera. And the result of that trigger will be a message in Telegram informing which camera detected the motion and the picture that triggered the motion trigger.
Pre-conditions
This tutorial is focused on the n8n workflow. The details of how to configure motion alerts on BlueIris, or how to configure the cameras on it are not in the scope of this tutorial. You should have a running installation of BlueIris with at least one camera configured.
Telegram configurations
Create bot
Before starting we need to create a telegram bot. This bot will provide us a API key that can be used to invoke the API to send messages.
On the telegram app (desktop or mobile) and start a chat with
@BotFatherWrite the command
/newbotChoose a name for the bot, I chose "Tutorial Hugo-ma-alves"
Choose a username for the bot, it has to be unique and end with "bot"
Copy and save the API key. It will be required later when configuring n8n

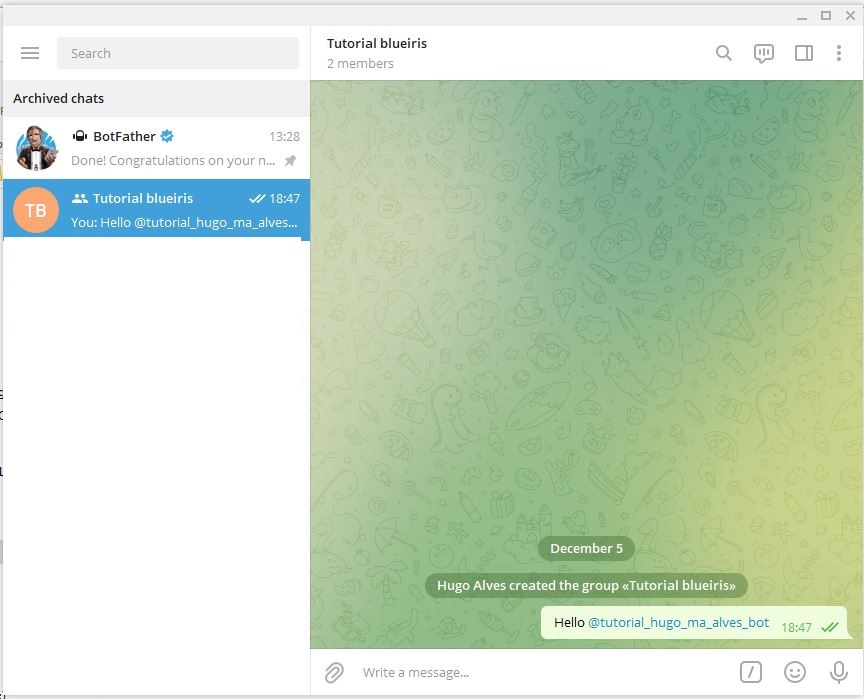
Create a Group chat to receive the alerts
Telegram messages API only allow us to send messages to a person or a group chat. So to receive the alert messages I will create a group with myself and the previously created bot.
Get the group chatId
The chatId is required by the Telegram API to specify to which chat to send the message.
To get the chatId we can use the Telegram API. But before doing that you have to send a message to the bot in the group chat.
To get the chatId we can query the getUpdates API.
https://api.telegram.org/bot${BOT_TOKEN}/getUpdates
Just replace the ${BOT_TOKEN**}** with the API key generated before. Note that the API key is prefixed with the word "bot".
And we'll get the chat id in the response.

Note that the chatId contains a "-" sign, this is part of the id, you must copy everything. For example "-213123".
N8n Workflow
Now that we have all the pre-requirements we can create the n8n workflow.
Configure Telegram credentials
To allow the n8n to use the Telegram API it is required to configure a credential on n8n. This credential will store the Telegram bot API key.
Open the n8n webpage. In this tutorial, I'm using a docker container, so I can access it using localhost:5678
Go to the credentials icon and select "new"
Search for the "Telegram" application
Enter the previously generated API key and then save and close.
Now n8n is ready to use the Telegram API.
Create n8n workflow
Remember that the objective of this tutorial is to receive a message in Telegram every time an alert is created on BlueIris. To achieve that BlueIris will invoke a webhook (POST endpoint) on n8n with a JSON payload. This payload will contain the camera name that triggered the alert, a base64 encoded image of the trigger and the event type.
So we can define the BlueIris sent payload like this:
{
   "alertImage":"Image encoded in base64",
   "camera":"Camera name",
   "type":"Event type"
}
Since configuring the workflow involves some steps please check the following video. If you don't want to do the manual steps, you can import directly into n8n the JSON file I provide after the video. This file will create the same workflow as shown in the video. If you import this file don't forget to edit the telegram nodes and update the chatId with the chatId of your chat!
Or if you are in a hurry you can import the n8n workflow below:
{
  "name": "BlueIris Alerts",
  "nodes": [
    {
      "parameters": {},
      "name": "Start",
      "type": "n8n-nodes-base.start",
      "typeVersion": 1,
      "position": [
        240,
        300
      ]
    },
    {
      "parameters": {
        "httpMethod": "POST",
        "path": "56960d22-b57e-421e-a118-aaf5d8fd0d81",
        "options": {}
      },
      "name": "Webhook",
      "type": "n8n-nodes-base.webhook",
      "typeVersion": 1,
      "position": [
        260,
        500
      ],
      "webhookId": "56960d22-b57e-421e-a118-aaf5d8fd0d81"
    },
    {
      "parameters": {
        "chatId": "-0000000",
        "text": "=Motion detected on camera: {{$node[\"Webhook\"].json[\"body\"][\"camera\"]}}\nEvent type: {{$node[\"Webhook\"].json[\"body\"][\"type\"]}}",
        "additionalFields": {}
      },
      "name": "Telegram",
      "type": "n8n-nodes-base.telegram",
      "typeVersion": 1,
      "position": [
        540,
        360
      ],
      "credentials": {
        "telegramApi": {
          "id": "1",
          "name": "Telegram account"
        }
      }
    },
    {
      "parameters": {
        "mode": "jsonToBinary",
        "convertAllData": false,
        "sourceKey": "body.alertImage",
        "destinationKey": "alertImageBinary",
        "options": {
          "dataIsBase64": true,
          "fileName": "trigger.jpeg",
          "keepSource": true,
          "mimeType": "image/jpeg"
        }
      },
      "name": "Move Binary Data",
      "type": "n8n-nodes-base.moveBinaryData",
      "typeVersion": 1,
      "position": [
        540,
        600
      ]
    },
    {
      "parameters": {
        "operation": "sendPhoto",
        "chatId": "-00000000",
        "binaryData": true,
        "binaryPropertyName": "alertImageBinary",
        "additionalFields": {}
      },
      "name": "Telegram1",
      "type": "n8n-nodes-base.telegram",
      "typeVersion": 1,
      "position": [
        760,
        600
      ],
      "credentials": {
        "telegramApi": {
          "id": "1",
          "name": "Telegram account"
        }
      }
    }
  ],
  "connections": {
    "Webhook": {
      "main": [
        [
          {
            "node": "Telegram",
            "type": "main",
            "index": 0
          },
          {
            "node": "Move Binary Data",
            "type": "main",
            "index": 0
          }
        ]
      ]
    },
    "Move Binary Data": {
      "main": [
        [
          {
            "node": "Telegram1",
            "type": "main",
            "index": 0
          }
        ]
      ]
    }
  },
  "active": true,
  "settings": {},
  "id": 2
}
To sum up, the workflow contains 3 main nodes.
The webhook trigger is the entry point of the workflow. This node expects to receive a POST request with a JSON payload.
Two telegram nodes. These nodes are responsible to send the message to the Telegram chat. One node sends a text with the camera name and another sends the image.
A Binary converter. This step is required because the image that BlueIris sends is encoded in Base64. So before using the sendPhoto operation of the Telegram node, we must convert the base64 to binary.
After creating every node don't forget to save!! (like I did in the video) and activate the workflow (toggle on upper right corner)
Configure BlueIris
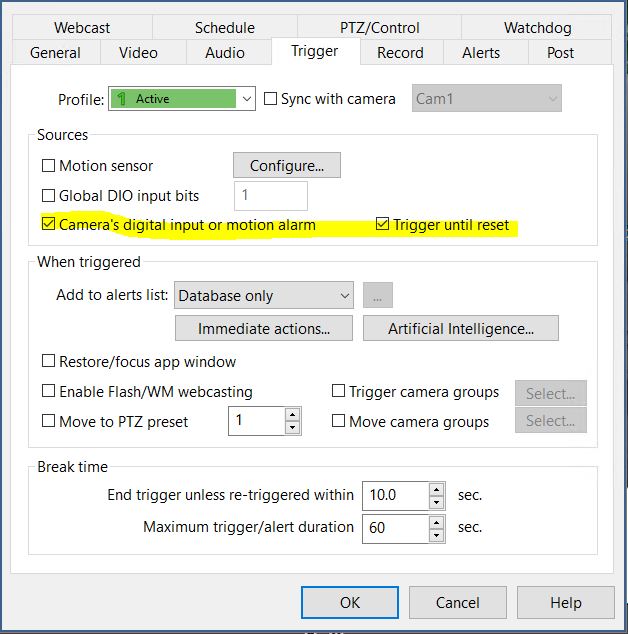
Finally, we have to configure BlueIris to invoke the n8n webhook. As said before this tutorial will consider that the cameras are already configured in BlueIris.
But just to give some context about my setup. I am using hikvision cameras, and I'm using the onvif triggers to trigger BlueIris. Then these triggers will create an alert that will invoke the n8n webhook.
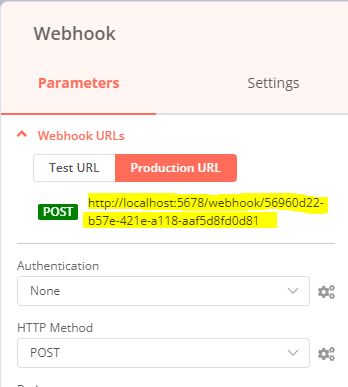
Before continuing we will need to retrieve the webhook url. We can view this URL on the n8n workflow webhook node. We are going to skip the test phase so choose the Production URL. Be aware that because I am using a docker instance, just for the sake of the tutorial, the webhook URL points to localhost. To make it work on BlueIris I will replace localhost with my internal network IP address. Please adapt this URL to your scenario, for example, if you use n8n cloud you should have the correct URL on the webhook node.
To configure the alert action on BlueIris, go to the camera settings page, then on the "Alerts" tab click on "On Alert" button. Then on the new windows click on the "+" icon and add a new "Web Request or MQTT". And finally configure the alert with the following data:
| HTTP | Your webhook URL |
| Post Payload | {"alertImage":"&ALERT_JPEG", "camera":"&NAME", "type":"&TYPE"} |
| HTTP headers | Content-Type: application/json |
Here the interesting part is the Post payload field.
{
   "alertImage":"&ALERT_JPEG",
   "camera":"&NAME",
   "type":"&TYPE"
}
All of these fields are variables injected by BlueIris when it generates the request. To see the full list of the available variables check the BlueIris manual.
Testing time
Let's see if everything works as expected. To test the workflow we can manually trigger a camera on BlueIris. To do that we just have to click on the orange lightning icon on BlueIris interface (while we have a camera selected).
On the following gif, I manually trigger an alert on BlueIris, the left side of the screen. Then on the right side, we can see that n8n executed the workflow successfully and we received the expected message and photo on the telegram chat.

And that's it, with n8n you can create some useful alerts on BlueIris.